How to encrypt windows with Bitlocker
BitLocker has become a great piece of “free” software to encrypt your hard drive or just some files. This is a quick guide on How to Encrypt Windows with BitLocker.
Why Encrypt? In case someone steals your device they have access to everything! Please Read my Encryption Blog Post. Click Here
Before we begin
- You will need Windows Vista Ultimate, 7 Ultimate, 8 Pro, 10 Pro or higher to use BitLocker.

- You will also need a USB stick if your computer doesn’t have a TPM chip. (This USB stick will need to be inserted when you start up you computer)
Lets get into it
1. Go to your start menu and type “BitLocker“
2. Encrypt a drive of choice. Most of the time you want to encrypt your Operating System drive. Click Turn On BitLocker

3. If you get this error then we need to disable the TPM section in Group Policy editor.
Please read my blog post. How to Bitlocker without a TPM.
4. All is well? Then lets continue. Please have a backup just in case something goes bad. A backup is the most import thing to have.
Please read my post on Onsite backup

5. Your computer will check to see if it is compatible with BitLocker and run a test to see. Its a Great idea.

6. Pick at least 2 places to save your recovery key. This is the thing that unlocks your drive.
Continue on and it will ask for one more restart and then
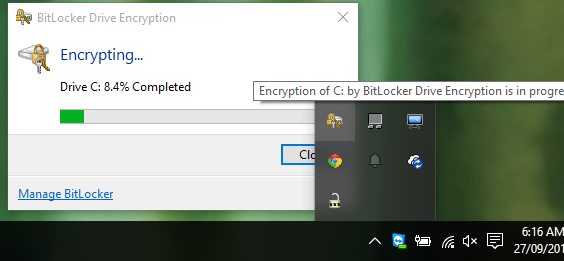
7. Your finished! Now its going to do its thang and encrypt your drive. To check to see its progress go to your System Tray at the bottom right and look for this groovey little icon and you can click on it to get an exact percentage.

Luke Keam
techgeek.biz
FOLLOW US